
Learning Photography: Exposure

The fundamentals of photography tend to start with exposure. (The first introduction was to shoot RAW) You've probably have heard of the exposure triangle: Shutter Speed, Aperture, and ISO. Each component controls how much light is allowed into the sensor of the camera.
So how do you determine what settings to use for shutter, aperture, and ISO? That's up to you as a photographer. How much movement (shutter), depth of field (how much you want in focus, aperture), and the brightness (shutter, aperture, ISO) you want in the photo.
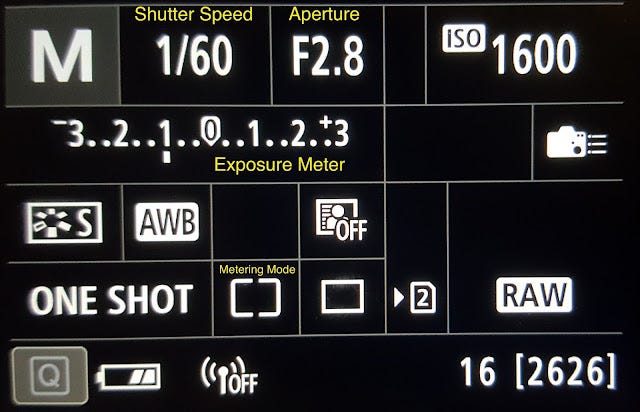
The exposure meter will show you how bright the settings are at currently. (The metering mode you're in matters too but that another topic for another time) Ideally, you want that at "0" or the "correct" exposure. In the photo above, the camera is 1 light stop underexposed (too dark).
Shutter Speed
This controls how long the sensor is exposed to light. The longer the shutter speed, the brighter the picture will be. You can show the movement of things by having a longer shutter.
This is usually the number in a fraction (unless you do longer shutter speeds than a second).
Real World: The faster your subject is, the faster shutter speed you want. You can show movement by slowing the shutter speed. You can do things by having a long exposure (seconds-minutes) like making moving people disappear from scenery or making water look smooth.
General Advice: If you are shooting with the camera in your hand, your shutter speed should be no slower than 1/(the focal length). For example, if you are shooting at 50 mm, you shouldn't have a slower shutter speed than 1/50 for sharp photos.
Aperture
This is how much the lens opens up when you take the picture. I like to compare this with the human eye. The smaller the aperture, the clearer everything in the picture will be; this is similar to how people squinting to see things more clearly. How much of the photo is in focus is called the Depth of Field (DOF). Larger apertures tend to blur everything that the camera is not focused on (a shallow DOF). The blur is called bokeh.
This is the f/ number (or f-stop). The smaller the f-stop, the larger the aperture. When you look at lenses, you will probably see the smallest f-stop the lens is capable of (maximum aperture, wide open).
Real World: If you want that smooth blurry background, use a larger aperture. (Also try to make the distance between the subject and background bigger). If you want everything in the picture to be in focus, use a smaller aperture.
Advice: Shooting at the smallest apertures can possibly cause affect image quality. Most of the time for landscapes and such, f/8-f/11 would be sufficient.
ISO
This is how sensitive the camera sensor is to light. Ever wake up and you only see white because your eyes weren't ready for something so bright? Well, that's basically when the ISO is higher than it should be. ISO refers to the sensitivity, the signal gain, of the camera's sensor.
ISO usually range from 100-16000. ISO only affects the brightness of the photo, but it can cause the photo to be grainy/noisy when the ISO is higher.
Real World: Adjust ISO as needed after setting aperture and shutter speed. It's easy to set the ISO in general environments (e.g. 100/200 on sunny days). Avoid setting the ISO too high to avoid grain. Test your camera with high ISO settings and see how much grain you are willing to accept.
Summary
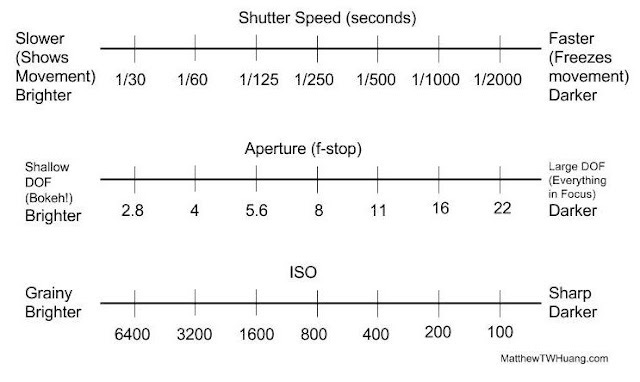
The more you take photos and adjust the settings, the easier it will become to set for the photo you want. Keep in mind each interval is 1 step of light. Shutter speed and ISO halves/doubles while aperture isn't completely intuitive.
Tip: You can set the size of increment adjustments each of the settings on your camera. For example, you can set the shutter speed, aperture, and ISO to increase/decrease by 1/3 light stops when you adjust those settings. So you don't have to do the math of each setting to get the same exposure but different combination of the three settings for the picture you want.
Adjust settings after getting the right exposure
What if you have the right brightness but the combination of shutter speed/aperture/ISO just isn't what you want in the photo? Maybe there's too much movement, or the background is too blurry, or the ISO is making the photo to grainy.
You can adjust the exposure using a different combination of the three things. You can guess and check. Or you can reduce exposure by a certain light stop for one of the settings then increase the same amount of light stop in another setting. For example, you can change decrease the shutter speed by one stop (e.g. 1/500 to 1/1000) and increase the ISO by one stop (e.g. 400 to 800); this would capture faster movement.
Mindset
Essentially what goes through my head when I'm taking a picture is:
1. What's moving in my picture and do I want to show what is moving?
2. How much of the picture do I want to be in focus and how much do I want to be blurry?
3. In terms of brightness, what is the most important part to capture in detail? This can be difficult in situations where there's a large contrast in light. Knowing what you can bring up/down in brightness in post-shooting is crucial in getting the picture you want.
Most of the time I adjust my shutter speed and aperture for what I want, then adjust ISO if I need to.
Beginner's Tip: If you want to slowly transition into manual, you can use the aperture priority (Av on Canon/A on Nikon) or shutter priority (Tv on Canon/S on Nikon) modes on your camera. In these modes, you either set the aperture or shutter yourself and the camera will auto-select the rest of the settings that will put the exposure meter to 0 (if possible). In both of the modes, you may select auto-ISO or set that yourself.
Let me know what you think about this learning photography post. If there are any aspects of photography you would like to learn more about, just make a comment.